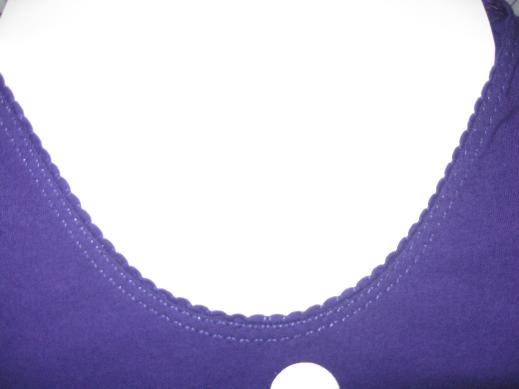
 This is the finished neckline. On the t-shirt I used a tiny zigzag and stitched two rows to sew down the binding. In my example I used a twin needle. If my coverstitch machine was working, I would have used it instead.
 On my Bernina, the shell stitch is #3. It looks something like the blind hem stitch except that is in reverse. Instead of the needle moving to the left to make the prick stitch on the hem, the shell stitch moves to the right one stitch to make the shell.
You need to use matching thread. However, in my sample I used a contrasting thread so that you could see what I was doing.
 This is one of my bad pictures. What I did was to take a strip of fabric 1 1/2 inches wide and fold it in half. I made mine wider, you'll see why later. This strip should be long enough to go around the neckline plus a bit more. Then I used the shell stitch taking the one stitch barely off the folded edge of the fabric strip. I didn't stretch in any way, however the stitching does stretch the fabric a little. This is normal. Then I serged on the other edge to get a nice finish. This is optional but I recommend it as it does help keep the strip edges together.
 Next I attached the strip to the neckline edge, pulling slightly as I stitched. You can see it puckered the garment fabric slightly. This stitching (in red) needs to be just slightly inside the straight part of the shell stitch. That way, these stitches won't show from the outside on the finished neckline.
When attaching this strip to the neck edge, I recommend you leave one shoulder open and attach the strip flat, not in the round. Then stitch the shoulder seam with the strip folded out. I really need a picture for this so I guess I'll have to make another t-shirt and then I'll add the pictures of this step.

To finish off the neckline, you need to stitch the shell stitch trim down. You can see here that I used a twin needle. Can you see the white zigzag stitch with the red top thread pulling? That is where my topstitching is. My trim was cut 2" wide and is a bit too wide but I did that on purpose so that the twin needle stitches wouldn't be hiding in the serger stitches. Yours will be right on top of the serger stitches.
 Here is the twin needle stitches from the top of the garment. This would look fantastic if the stitches were all done in matching thread.
What do you think? Anything confusing about my first tutorial? How can I fix it to make it better, knowing I'll be adding a couple more photos of an actual t-shirt in construction?
Sherril,
ReplyDeleteYour tutorial is very clear and well-illustrated. Thanks you for taking the time to post it.
Good tutorial Sherril. I'm all inspired to go and try to do it on my machine. :)
ReplyDeleteGood tutorial--makes sense. Thank you for sharing. In re-checking my machine's manual, I found I have the shell tuck stitch--Woohoo! Wonders never cease if you just read once in a while. Time to go play!
ReplyDeleteSherrill, this was most helpful. I have bookmarked this as I will want to give this a try!
ReplyDeleteSherrill this is FABULOUS! THanks for the tutorial!!
ReplyDeleteThank you for the tutorial! My finding your blog is perfect timing. I just cut out 2 t-shirts and I am going to do this on one of them! Great blog!
ReplyDeleteThis is awesome!!! Thank you, sherril. :)
ReplyDeletegazelle
Sherril - good to read this! Nice work. I don't think mine would look this nice! Glad to see you posting on PR! m:)
ReplyDeleteGreat tutorial :)
ReplyDeleteHugs from Poland
Agata