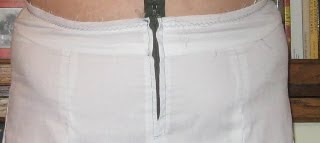
I should have had this skirt finished earlier in the week. After all, the muslin only took me about 10 minutes to sew. I tried every day this week to get this skirt done. I got the back seams done during my intermediate sewing class on Tuesday while the students were cutting out their patterns. I finally took the time to sit down yesterday and got most of it done, and I finished it this morning.
I'm very pleased with the way it turned out. The fit with the lycra fabric is perfect. If I were going to nitpick about the fit, it would be that I need to remove another 1/4" from the back as it's got just a tad bit too much length under the waistband. But like I said, that's nitpicking and with an untucked top, no one would notice.
I'm very happy about the length. I would have looked ridiculous in the micro-mini length that was drafted, but with my additional 6 inches, it's perfect for a middle aged overweight mom. It looks good with low heeled sandals and with my platform sandals, which is how I'd probably wear it to work.
I love the details in this skirt pattern. The pocket is a nice touch and my fly zipper turned out great. It's the first one I've done without first reviewing Debbie's tutorial. I decided not to use a straight waistband, which I said I was going to use after trying on the muslin. Instead I altered the front band so that it had very little curve while I left the back waistband unaltered. You can see in the pic that it's pulling just a tiny bit, but it's much better than the muslin. Again, that's just nitpicking.
I searched my stash and then went JoAnn's and couldn't find a button that matched to use on the skirt. I just used a white button and painted it with a blue permanent marker. It'll be interesting to see how this does in the wash.
In order to make this skirt adjustable for weight loss, I sewed it a bit differently from the pattern instructions. (At least I think they're different as I didn't really read the directions.) I made the back, added the waistband, then the facing. I made the front piece the same way, with the waist band and facing attached. Then I sewed the front and back together all the way through the waistband and facing.
This way, all I have to do is remove the stitching that holds the facing down, press the seam closed and then take in the side seams. No fussing with the waistband at all. The only problem with this method is that I eliminated the staystitching, which means that the facing wants to turn out and show at the top of the waistband. That wouldn't have been a problem if my facing had matched but I was trying to use up some old quilt fabric scraps. The best part is that you can't even tell I didn't sew the waistband as one piece and I'll be able to wear the skirt for a longer time through my weight loss.
I did make the belt loops but decided to leave them off for now. If the skirt becomes too baggy after I've altered it once, then I will apply them so that I can use a belt to hold the skirt up if I still feel like wearing it. It's just one of the trick used for sewing for weight loss.
While I'm usually not a tuck-in kind of girl, I'm thinking this skirt looks OK on me with the top tucked in. I didn't pull it out for any of the pictures because, well, I was trying to show you the skirt. What do you think, tucked or untucked?
Sunday, April 25, 2010
Monday, April 19, 2010
Tilted Waist Alteration
Yesterday there were a couple of comments asking about how I make a tilted waistline alteration. I do it differently depending on whether there are pockets or not. If not, I can just cut down the front and then add to the top of the back. However, when there are pockets involved, things get a bit more complicated.
When I do a tilted waist alteration, I always leave the side length alone and lower the center front and raise the center back. Since this pattern had pockets to deal with along with princess seams, I decided to take a wedge from the front side pattern piece. I cut from the princess seam to, but not through, the side seam stitching line along the lengthen/shorten line. Then I clipped from the side seam to but not through my first cut. This left a hinge where I could overlap a full inch, but leave the side seam length the same. After taking out the wedge, the pattern piece became decidedly crooked. I had to true up the sides of the pattern piece by taking a ruler from the straightest two points and drawing a line. I did this on both the princess seam and the side seam. The white pattern piece above is what it looked like after truing.
I then needed to shorten the center front pattern piece the inch, but instead of taking out a wedge, I just took out a full inch across the whole pattern piece. You won't see that on my pattern piece however. Since the pattern piece is parallel down the length, I just removed the inch from the hem.
Please click on the photos to see them closer up. After making the new side front pattern piece, I needed to adjust the pocket pattern. It became skewed so that I had to add to the center seam and adjust the grainline. You can also see that it changed the height of the pattern piece at the side seam so that it didn't match the back piece. In the picture you see my side seam alteration for my thicker waist on the pocket piece and the side back piece.
To add to the back I just taped more tissue to the top waist and drew in my shape. I know my shape because it's the shape that happens to my elastic waist pants when I tie my elastic around my waist and I pull them up and down until they hang properly. The inch and a quarter was a guess and as you can see in my muslin from my last post, it was too much.
I finally decided on what fabric to use for the skirt. The blue floral is a stretch twill and I only had a small amount. Luckily it was just enough to cut out this skirt. I had the blue cotton knit in my stash and I think it matches really well. My husband thinks it's too much blue, but I think that a monochromatic color combination may make me look thinner. At least I hope so. I also want to make a white top to go with the skirt.
Sunday, April 18, 2010
Weekend Sewing
I haven't quite finished the purple blouse. I haven't started the skirt yet either. I know I need to get them finished before they are too big for me, but I'm just not feeling the love for the blouse so the skirt isn't feeling right either.
However, I need clothes to wear. I went through all my clothes on Saturday and pulled out two kitchen size trash bags worth of clothes to give to my nephew's wife. There are a few things that are going to Goodwill, and my t-shirt remakes all went into a box. I kept them for my trunk show that I present when I teach my Designer T-shirt class.
Instead of completing my purple outfit, I decided to make a denim type skirt. Since McCall's patterns were on sale for 99 cents this weekend, I picked up McCall's 5429. I checked out the reviews on patternreview.com and decided to make the short skirt, just lengthen it 6" because a micro mini isn't a good look on me, even though I do have nice looking legs. You can't tell from the drawing, but it's an a-line skirt. I like the seams and pockets very much. It has the fly zipper which is a must for a denim-type skirt.
I spent most of the morning making my alterations to the pattern. I added the length which was 6" plus 1" for a hem, I gave it a tilted waistline and I altered the waistband and skirt for my thick waist. I used the largest size, which is size 20. The pattern hip measurement was exactly my hip measurements for this size.
Most of my alterations were perfect. I know the skirt looks quite tight on me, and it is. You can see my not quite as big as before round belly outlined in the photo. However, I plan to sew it up in a stretch twill which will give me the ease I need. Muslin doesn't have any stretch at all. I have to say I'm pretty happy with the fit for the most part. I didn't put the pockets on the muslin since they wouldn't make a difference to the fit.
For the muslin I cut the center back on fold, but when I sew up the garment, I'll put in that seam. It looks like I probably added too much at the center back and will reduce this by 1/2" before I make the final garment.
I'm very pleased at how I got it to hang evenly at the hem and still fit my tilted waistline. I wonder if this tilt will go away when my big round belly goes away? Hey, a girl can dream, can't she?
If you're not already taking pictures of your garments to check out fit, you really ought to. I didn't see that the waistband was pulling toward center front until I studied the photo. I really shouldn't use a shaped waistband. They never fit right. The circumference is perfect, so I think it's just the shape of the curve that's causing all the pulling. I've decided to use a straight waistband for this skirt.
So, if I don't work tomorrow, I'll have a new skirt and hopefully a new t-shirt to go with it. Too bad it's supposed to rain on Tuesday or I'd have a new outfit to wear to teach class in. The students should be finishing their tote bag and will start on the apron. I'll try to remember my camera so I can show you their very first projects.
Sunday, April 11, 2010
Pretty In Purple
I'm not so pretty today, which explains why I have no head. I'm going quite slow on this top and will probably not finish it today because I have work to do for my beginning sewing students and I'm not feeling well today.
When I first made this shirt in the black w/white dots, I added a FBA that was probably too large. Now that I've lost more weight, I removed most of the FBA and all of the excess added under the bust. Still, I had to take in the sides by 3/4", that's a total of 3" to make it fit better. However, now it fits weird in other places, like the neckline and under the bust. Maybe it fit like that in my first version of this blouse, but that fabric was much softer than this stretch cotton shirting.
There is also too much fabric going over the bum which I should have removed at the princess seam instead of taking it all from the side seam. The shoulders are too long and I should have noticed that they needed to be reduced before I sewed in the sleeve and serged the seams together. Oh well, since I don't expect to wear this one for very long, I'll keep it as is.
If you were wondering where I got the new short sleeves from, they are the short sleeves from Sandra Betzina's weird blouse V1017. Sorry, but the pattern is now OOP. I really liked them on her pattern envelope and think they are perfect with all that puff for this blouse. I still have to sew buttons and buttonholes and hem it. I'm thinking that it needs to be shorter by maybe 2 inches. What do you think?
I hope everyone has a great week.
Monday, April 5, 2010
Health Update
I just got back from the Gynecologist's office and the pathology report showed all normal cells. Everything is fine and I'm definitely in menopause. The polyps were removed and I don't have any ovarian cysts. I shouldn't experience any more problems and I won't need a hysterectomy. I lost 6 pounds since March 21st.
I don't think I've ever left the Gyn office feeling like I was walking on air before. It was just good news on top of good news. Yea! I just want to thank everyone for their good thoughts and prayers. Prayer works.
Saturday, April 3, 2010
It's No Garden Party
It's a sack. At least that's how the Indygo Junction Garden Party Pullover looks on me. The description says it's a mid-hip pullover with raglan, cap sleeves that are easy to sew and comfortable to wear. The inset can be adjusted up or down depending on desired coverage. Gentle gathers above the bust add an easy fit and empire seaming in the back is slimming.
They are right, it was easy to sew and is comfortable to wear. But so would a bag. I have to admit that since this fit over my body and especially my bust, before I lost weight I might have be tempted to be happy with the fit of this blouse. I think what appealed to me about this blouse was the pretty fabrics on the front of the envelope. In muslin, it doesn't look good at all.
Does that empire seam look slimming to you? I think all those seams in the back break it up and add inches. However, I did use the seam to take my swayback adjustment and it looks to be successful. The raglan sleeve seam, which is hard to see in the picture, might be a good place to make my sloping shoulder adjustment if I were inclined to actually make this garment. Which I'm not.
So, while I've wasted a day of tracing and cutting/sewing my muslin, I'm am not going to waste any more time and fabric on this pattern. I have already decided what my next project is going to be.
I'm going to make a skirt and blouse from these fabrics. The purple will be a skirt using S2609 and the blouse will be my Kenneth King Clone top I made from a RTW blouse. I think the two patterns will look good together.
Unfortunately I haven't made the skirt before, but I think I'm going to just measure and plow forward with my purple silk noil and anti-static lining. The blouse fabric is a stretch cotton shirting. I'm definitely going to make the sleeves shorter on the blouse as it will be for a spring outfit. I love the idea of an elastic waist skirt because it should last longer during my weight loss. All my pants are getting so baggy in the butt that I'm embarrassed to wear them. I've gone from size 20 to 18 and now I'm wearing 16s that are baggy in the butt.
I want to thank everyone for their encouraging words regarding my weight loss. I couldn't be more happy with myself. I know I didn't gain it over night and it will take over a year to come off, but I've never felt so empowered to actually make my goal. Sondra, your comment on my last post really spoke to me. My husband doesn't read my blog and doesn't know how much I weigh either. He's 6'2" tall and just this week I've lost enough to weigh the exact same as he does. If I were to dwell on that, I might not have the courage to move forward. My next goal is to weigh less than my son who is at 165 pounds.
Happy Easter to you all. I hope you have a great weekend.
Thursday, April 1, 2010
Fitting Butterick 5300
Last June I worked on fitting Connie Crawford's blouse pattern, B5300. This pattern comes in regular and plus sizes and I made up a muslin in Woman's 1X and one in the Misses XL with only adding 5/8" to the seam allowance. You can read about it and see the pictures of each muslin here.
According to my blog entry, I altered the misses XL pattern giving myself a ton more ease but I never did make another muslin. Now I wish I hadn't made the alterations either.
This is a comparison picture of me in the XL muslin in June 09 and of me wearing the same muslin today. I don't need any more ease added. In fact, a dart is trying to form under my bust and I'll need to rotate it into the side dart to make it hang properly. Since this is a pattern that I didn't trace but took my scissors directly to the pattern, I may have to re-buy the pattern. It's possible that I bought it twice but I'll have to go on a hunt through my hundreds of patterns to know for sure.
I think it fits pretty darn good right now with only the 5/8" added to the side seam. It still needs a tiny amount of ease in the bust but I think it'll be fine if I lose 3-5 more pounds. This is the first eating plan that I've ever been on where my bust didn't shrink fast and dramatically. My belly and hips are what I'm losing this time around. If I can keep my bust and lose only my belly and hips, then I am calling this plan a miracle.
I've been busy cleaning up my sewing room today so that I can then search for the pattern. I hope to get the blouse cut out and started later today or tomorrow. Next week the beginning sewing classes begin that my partner Stephanie and I will be co-teaching. I'm going to be so busy I won't know if I'm coming or going and personal sewing time will become extremely limited.
Subscribe to:
Posts (Atom)