
In order to draft the neckband. I took a piece of my fabric on the cross grain and stretched it around my pattern neckline. Then I measured this amount. I hoped it would be about the right length for my fabric's stretch amount and it was. The neckband was 1-1/4" shorter than the neckline for my fabric. Your mileage may vary. In order for the neckedge of the band to snug against my body, I angled the shoulder edge. Since I gathered the shoulder edge, I made the angle steeper than the angle of the bodice shoulder. The shortening that the gathers did also change the angle of the cut edge. I wish I had taken a picture of the neckline edge before I sewed the top together. Sorry. I will on my next version.
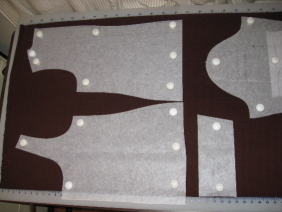
To make the pleats on the neckband I had to mark the pleats. Well, my fabric was so dark I had to get creative on the marking. I decided to use tape. You can see on the left side of the picture below, (you may have to click onto the photo) the tape and the markings. I left a slit between the tape for my stitches. Then I pleated the fabric up and pinned it down. I was afraid the pins would cause problems under the pressure foot (center of photo below) so I decided to put tape on the pinned area and then remove the pins. That worked perfectly except then I had to sew over tape, which was what I was trying to avoid. On the left of the photo below you can see the pleats sewn and tape removed. These pleats are covered by the tabs on the neckline. The pleats are necessary to keep the neckband scrunches in place. I decided to gather the shoulder of the neckband instead of doing the pleats. I think it was just easier and didn't make any difference, IMHO.
 For my fabric I used a dark brown moire textured poly knit. It has a slight sheen to it but not shiney. We all now know I won't do shiney. I learned my lesson. The texture of the knit gives it dark and light areas in the photo, but it doesn't look like that IRL.
The tabs were made by cutting a strip of straight grain fabric and serging it using the left edge of the pressure foot as my guide. If you make a long tail of serger stitches before you put the fabric under the foot, you can take that tail, put it inside the fold as you stitch and then just pull the tail. The tube will then turn itself inside out. I cut the tabs about 1 inch shorter than twice the width of the pleated area of the neckband. Oh, I forgot to say that I also folded over the edge of the neckband and just stitched with a straight stitch. It's not going to stretch much so I wasn't worried about breaking the stitching. I pinned the tabs at center front and the other two evenly spaced from the center right over the place where my pleats on the neckband were to be stitched to the neckedge.
 Since this top is for fall and summer, I decided to give it 3/4 length sleeves. I find them a bit more flexible than long or short sleeves when it comes to the weather. Not that So. California really has any weather to speak of. I'm calling this top, garment #1 of my Endless Combinations Wardrobe. It's not one of the fabrics from my basket, but I think it will go just fine with everything that is in the basket. I'm very pleased with my interpretation of this CWC top.
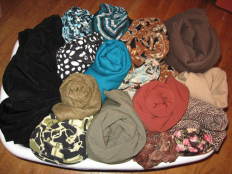
As for the other Coldwater Creek garments I wanted to make, I have already drafted a pattern for this black tie-neck top and hope to get it made sometime this week. It will be a long sleeved version and I hope the neckline isn't too low for my 12 - 14 yo male students.

I also wanted to share my completed twin set. I think the top came out a bit more snug than I like. I have it all pulled down, but after wearing a bit the bust starts to show some straining. I think next time I make this twin set, I will take this neckline and put it on my TNT t-shirt pattern. I should have just done that in the first place, now that I think of it.

Does anyone else think my bra is giving me a really weird bust placement or maybe it's just how I'm being shaped? This is my only Wacol bra. I don't think I'll buy any more of these. Sorry, the picture had me distracted.
The fabric is the same poly moire textured knit as the CWC neckline t-shirt and you can see the texture in this picture. I just love the red color on me.

This twin set is going to go great with my black slacks just as soon as I feel I can face that pants pattern again.
Hi Sherril!! The dinner plate idea is great/cute!! Speaking of, it's nice to see SMILIN' pics of you!! Your three creations are really nice. (And, no, the brown top doesn't LOOK too low--you'll know if you bend over and "look down", eh ;) )
ReplyDeleteSoft hug,
Rhonda in Montreal (PR)
Sherril - you gave me too much to ingest at one sitting. I have sewing indegestion from this post and the previous one. I am going to ponder and will comment again tomorrow.
ReplyDeleteBUT as always - amazing food for thought!
And as an aside - I wish I could wear vivid colors like you - I yearn for them as solace to my soul, but alas, next to my pasty Irish-heritage skin they look like pthghgh (imagine hairball sounds here). So jealous of your coloring!
You sure have a knack for picking colours that are perfect on you. I love all these tops on you!
ReplyDeleteYou look great. You have a good sense of style.
ReplyDeleteThe tutorial is very good to have available.
Great job and inspiration Sherril. I like how your neckline is more sweetheart shaped than the original rounded one. I may try this technique. Thanks
ReplyDeleteDru
Hi, I love your blog. You give me so much inspiration to start sewing for me once again. I sewed for my daughters for so many years. Now they are grown, they are not so interested in me sewing for them anymore. I also Heirloom Sew. But, I want to get back to garment construction for myself. I am plus sized. I notice you make alterations...lol...well I don't know how to do this. Can you recommend any books for me. I also have started looking at purchasing a dress form. Any yays or nays on those too.
ReplyDeleteThanks ever so much.
First time I post to a blog...so I may have done this wrong. My email address is jcenacm@aol.com
ReplyDeleteThanks so much.
I love both the twinset and the new CC knock-off top! And you are right, you do look good in red!
ReplyDeletethanks for the tutorial.... now to copy yours!
ReplyDeleteSherril, the warm colors look so good on you, the reds, golds, browns, beiges. The twins set is awesome and so flattering with that black band. an yyour knockoff is so pretty on you too. You have the tees perfected!
ReplyDeleteGirl, that neckline on the brown top is magnificent! I really want to give that a try and will have your instructions pull up on the monitor as I do it. I'm in love with it!
ReplyDeleteThank you so much for posting this! I used your tutorial to draft my own version of the CWC t-shirt. I've got the muslin cut out and can't wait to see how it turns out!
ReplyDelete