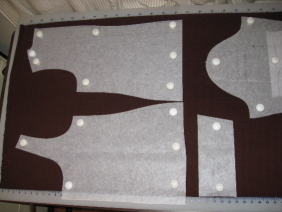
I was asked to do a tutorial on making the CWC top. You can see my pattern pieces
here. To make the pattern I took my TNT t-shirt pattern and drafted a new neckline. First, I divided the shoulder width in half and decided how low I wanted the neckline to be. Then using these two reference points, I made a pleasing curved neckline. I see now that I made the neckline too scooped and so for the next one I'm going to take a dinner plate and push it up against the neckline and redraw this curve. I want it to be more rounded. I haven't done the redraft yet but you can see what I intend to do in this picture. In order to keep the center of the neckline from being peaked or shaped like a V, I need to make sure that for 1/2" from center front I have a 90 degree angle. That's just good patternmaking techniques.

In order to draft the neckband. I took a piece of my fabric on the cross grain and stretched it around my pattern neckline. Then I measured this amount. I hoped it would be about the right length for my fabric's stretch amount and it was. The neckband was 1-1/4" shorter than the neckline for my fabric. Your mileage may vary. In order for the neckedge of the band to snug against my body, I angled the shoulder edge. Since I gathered the shoulder edge, I made the angle steeper than the angle of the bodice shoulder. The shortening that the gathers did also change the angle of the cut edge. I wish I had taken a picture of the neckline edge before I sewed the top together. Sorry. I will on my next version.
To make the pleats on the neckband I had to mark the pleats. Well, my fabric was so dark I had to get creative on the marking. I decided to use tape. You can see on the left side of the picture below, (you may have to click onto the photo) the tape and the markings. I left a slit between the tape for my stitches. Then I pleated the fabric up and pinned it down. I was afraid the pins would cause problems under the pressure foot (center of photo below) so I decided to put tape on the pinned area and then remove the pins. That worked perfectly except then I had to sew over tape, which was what I was trying to avoid. On the left of the photo below you can see the pleats sewn and tape removed. These pleats are covered by the tabs on the neckline. The pleats are necessary to keep the neckband scrunches in place. I decided to gather the shoulder of the neckband instead of doing the pleats. I think it was just easier and didn't make any difference, IMHO.

For my fabric I used a dark brown moire textured poly knit. It has a slight sheen to it but not shiney. We all now know I won't do shiney. I learned my lesson. The texture of the knit gives it dark and light areas in the photo, but it doesn't look like that IRL.
The tabs were made by cutting a strip of straight grain fabric and serging it using the left edge of the pressure foot as my guide. If you make a long tail of serger stitches before you put the fabric under the foot, you can take that tail, put it inside the fold as you stitch and then just pull the tail. The tube will then turn itself inside out. I cut the tabs about 1 inch shorter than twice the width of the pleated area of the neckband. Oh, I forgot to say that I also folded over the edge of the neckband and just stitched with a straight stitch. It's not going to stretch much so I wasn't worried about breaking the stitching. I pinned the tabs at center front and the other two evenly spaced from the center right over the place where my pleats on the neckband were to be stitched to the neckedge.

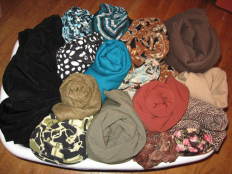
Since this top is for fall and summer, I decided to give it 3/4 length sleeves. I find them a bit more flexible than long or short sleeves when it comes to the weather. Not that So. California really has any weather to speak of. I'm calling this top, garment #1 of my Endless Combinations Wardrobe. It's not one of the fabrics from my
basket, but I think it will go just fine with everything that is in the basket. I'm very pleased with my interpretation of this CWC top.
As for the other Coldwater Creek garments I wanted to make, I have already drafted a pattern for this black tie-neck top and hope to get it made sometime this week. It will be a long sleeved version and I hope the neckline isn't too low for my 12 - 14 yo male students.

I also wanted to share my completed twin set. I think the top came out a bit more snug than I like. I have it all pulled down, but after wearing a bit the bust starts to show some straining. I think next time I make this twin set, I will take this neckline and put it on my TNT t-shirt pattern. I should have just done that in the first place, now that I think of it.

Does anyone else think my bra is giving me a really weird bust placement or maybe it's just how I'm being shaped? This is my only Wacol bra. I don't think I'll buy any more of these. Sorry, the picture had me distracted.
The fabric is the same poly moire textured knit as the CWC neckline t-shirt and you can see the texture in this picture. I just love the red color on me.

This twin set is going to go great with my black slacks just as soon as I feel I can face that pants pattern again.
 To make the v-neckline, I made a facing, then marked the shape I wanted. Since this is a poly jersey, I decided not to interface the facing since I wanted it to have all the movement and stretch of the rest of the top.
 I'm not an expert cover stitcher by any means, and the corners could use some work, but I think it turned out pretty nicely. The only real problem was at the bottom of the V where one of my coverstitch needles fell off the blouse and stitched only on the inset. I don't mind my sewing mistakes nearly as much as I used to and this one is so minor that I decided to just leave it.